[Inkscape To Web]: Make beautiful sites with SVGs
In this tutorial we will make a SVG drawing in Inkscape and will use it in a webpage. The goal of this tutorial is to know how to make beautiful SVG Drawing for your website.
Before starting you should have following things,
- Familiarity with SVGs/Inkscape and HTML
- Inkscape Installed.
How to Embbed
Step 1: Open Inkscape. Now make a simple Shape. I am making a polygon,

Step 2: Now save it as a svg. The inkscape saves its files as svgs but it is not compatiable with html. It a lot Inkscape specific(useless) data. To save it as plain Svg. Click on File->Save as. Then from dropdown box in the dialog box. Choose the .PlainSvg.

[Click on the Image to Enlarge]
Step 3: Now open your favorite code editor i am using the brackets. Now open this .svg File that we just saved using Inkscape.
 [Click on the Image to Enlarge]
Once opened it should look like this, you can delete metadata and other information.Only the <svg> tag and the path(encircled in red in below image) is required atleast.
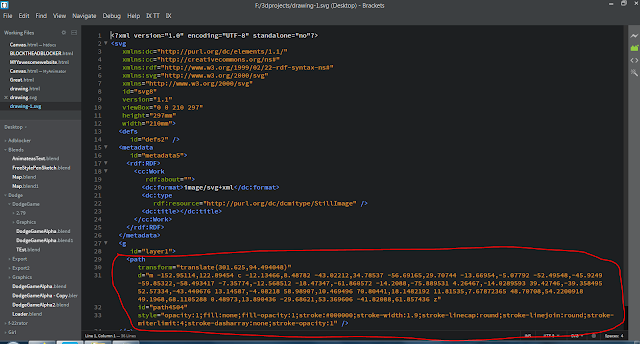
[Click on the Image to Enlarge]
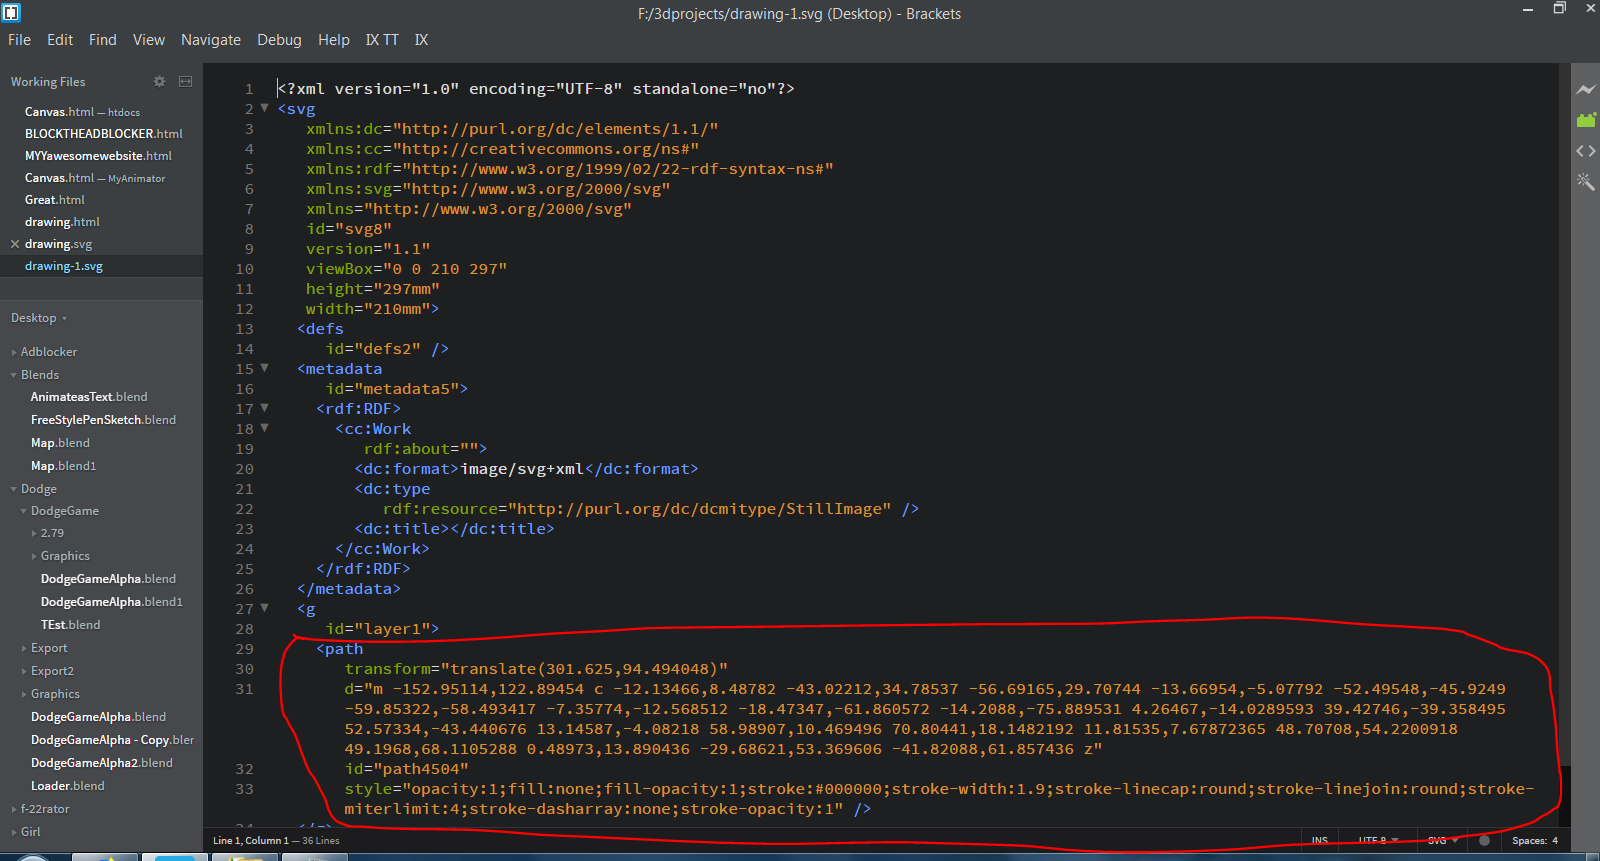
Step 3: Now open your favorite code editor i am using the brackets. Now open this .svg File that we just saved using Inkscape.

Once opened it should look like this, you can delete metadata and other information.Only the <svg> tag and the path(encircled in red in below image) is required atleast.
Step 4:Now Create a .HTML file and open it with your code editor. Write simple boilerplate webpage.
Step 5: Copy all the contents of the .SVG file in this HTML file.


[Click on the Image to Enlarge]
Step 6: Done!!. now open you .HTML file in browser.You will be able to see your svg drawing there.

How to Animate
One of the cool thing about svg is that they can be animated. We will create a simple code for animating our svg. It will animate stroke width.
Write simple css code for animating stroke width of our svg path like this,
<style>
<style>
.path
{
stroke-width: 1px;
animation: thick inifinte alternate;
}
@keyframes thick
{
to{stroke-width:20px};
}
</style>
{
stroke-width: 1px;
animation: thick inifinte alternate;
}
@keyframes thick
{
to{stroke-width:20px};
}
</style>
Add this class to your svg path tag.,
 [Click on the Image to Enlarge]
You can also save you inkscape drawing it as optimized SVG. Its not included in this tutorial because it have a lot of options, that you can export it with. Which will make this tutorial complicated and unnecessarily longer.

You can also save you inkscape drawing it as optimized SVG. Its not included in this tutorial because it have a lot of options, that you can export it with. Which will make this tutorial complicated and unnecessarily longer.
Muğla
ReplyDeleteSamsun
Eskişehir
Sakarya
Kars
NF7
Diyarbakır
ReplyDeleteKırklareli
Kastamonu
Siirt
Diyarbakır
XYTM5
Eskişehir
ReplyDeleteDenizli
Malatya
Diyarbakır
Kocaeli
C00H
goruntulu show
ReplyDeleteücretli
DG7
Kastamonu Lojistik
ReplyDeleteYozgat Lojistik
Çorlu Lojistik
Kırşehir Lojistik
Sinop Lojistik
0HDS
60833
ReplyDeleteDenizli Evden Eve Nakliyat
Yozgat Evden Eve Nakliyat
Antalya Parça Eşya Taşıma
Hakkari Evden Eve Nakliyat
Van Evden Eve Nakliyat
492A4
ReplyDeleteErzincan Şehirler Arası Nakliyat
Kilis Evden Eve Nakliyat
Etlik Parke Ustası
Hatay Şehir İçi Nakliyat
Erzincan Şehir İçi Nakliyat
Erzurum Şehir İçi Nakliyat
Rize Lojistik
Eryaman Fayans Ustası
Sincan Fayans Ustası
78CBB
ReplyDeleteMalatya Lojistik
Bartın Şehirler Arası Nakliyat
Urfa Şehirler Arası Nakliyat
Antalya Rent A Car
Çerkezköy Kurtarıcı
Çanakkale Şehir İçi Nakliyat
Sivas Şehirler Arası Nakliyat
Muş Şehir İçi Nakliyat
Silivri Parke Ustası
DC1B2
ReplyDeleteBaby Doge Coin Hangi Borsada
Ünye Oto Lastik
Silivri Cam Balkon
Yozgat Parça Eşya Taşıma
Yozgat Şehir İçi Nakliyat
Malatya Şehir İçi Nakliyat
Bingöl Lojistik
Çerkezköy Çamaşır Makinesi Tamircisi
Tekirdağ Evden Eve Nakliyat
4B58E
ReplyDeleteKayseri Şehirler Arası Nakliyat
Şırnak Şehir İçi Nakliyat
Urfa Evden Eve Nakliyat
Pursaklar Fayans Ustası
Silivri Parke Ustası
Bolu Şehir İçi Nakliyat
Btcturk Güvenilir mi
Gümüşhane Şehir İçi Nakliyat
Giresun Evden Eve Nakliyat
BC5E7
ReplyDeletebinance indirim
1F00D
ReplyDeletecanlı sohbet uygulamaları
urfa görüntülü sohbet siteleri ücretsiz
trabzon görüntülü sohbet siteleri ücretsiz
muğla kadınlarla sohbet et
yalova sesli sohbet uygulamaları
kırşehir canlı sohbet et
mobil sohbet sitesi
muhabbet sohbet
sohbet odaları
888D5
ReplyDeleteKripto Para Üretme Siteleri
Referans Kimliği Nedir
Kripto Para Çıkarma
Ön Satış Coin Nasıl Alınır
Binance Referans Kodu
Soundcloud Takipçi Satın Al
Kwai Takipçi Hilesi
Binance Referans Kodu
Binance'de Kaldıraç Var mı
8BE3020EBD
ReplyDeletetakipçi arttirma
C60B014261
ReplyDeleteig takipçi
M3u Listesi
M3u Listesi
Razer Gold Promosyon Kodu
Google Yorum Satın Al
Türkiye Posta Kodu
PK XD Elmas Kodu
Pokemon GO Promosyon Kodu
Dragon City Elmas Kodu
66B520F6BF
ReplyDeleteorganik düşmeyen takipçi
instagram beğeni satın al
güvenilir takipçi
telafili takipçi
yabancı takipçi