
Create Game Assets In Inkscape. Missiles


Let’s Create Game Assets In Inkscape. Missiles!


Hey guys, welcome to this new series in which ,we are going to make game assets with Inkscape.
If you are making a 2d game and looking for tools to make art for your game. Inkscape can be an excellent choice. You can make really good-looking art in Inkscape.

In this series we will create art assets for games. The goal Is to learn how to make game assets in Inkscape easy and fast.

In this first part of the series we will be making a simple 2d missile art asset. Our goal will be to learn how to use circles and powerful tools like Booleans in Inkscape to make awesome looking art easily.

If you don’t have Inkscape yet, download it from Inkscape.org.

So, Let’s Begin

Step 1 :Add a Circle using the circle tool. Also give the stroke and fill following color.
      
Step 2 :Scale it Vertically,


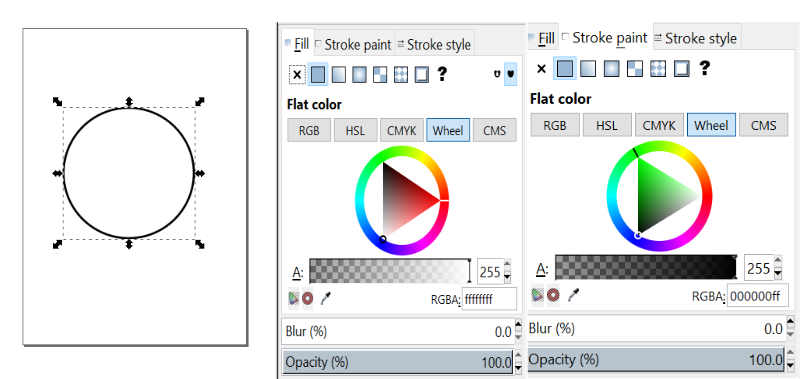
 then do object to path as shown. 
]

Step 3 : Select the edit path nodes button. and then select the upper node and change it to a corner node by using buttons in top left corner.
Also, make the bottom node auto-smooth.

Step 4: Change color and duplicate.


Step 5: Add a rectangle on top these current objects such that top part of the duplicated shape is NOT covered, that is the original shape and duplicate of it.
Then select the rectangle and duplicate only and Go to Path->Difference.


Result of this will be like this, only the point part that will did not cover will remain of duplicate.


 Step 6:  Change the color of the difference to red.


next add a Rectangle to the bottom side of our missile as shown. Also, Do Path-> Object to path.


Step 7: This new path will be our stand for missile. So we need to give it its shape. So, again choose edit path nodes and add new nodes in between the upper edge of our stand by click the plus icon in leftmost corner of the screen.


Step 8: Move node by using mouse to give stand its shape. You can be creative and give it any shape, just make sure that the missile can stand on it.
Step 9:  Once you are happy with it, Duplicate it and the Flip it, and move it to the other side of the 
missile.


Step 10: Scale and adjust missile horizontally to make it look more pointy. Because remember what Great General Aladdin once said  about missiles.


Step 11:  You can then customize your missile by changing its color. Also you can put stripes , text or anything to make it look cooler. I just a rectangle of light Grey color.

General, missile is ready. You can expriment with different fill and stroke style as i did below to make look more awesome ;).


This is it for this part of the series. In Next part we will be making Explosion animation.
I hope you this part of series and will love this series.
Thank you.


Comments

Popular posts from this blog

Gdevelop: How to manually export to android or ios using Cordova

In this post we will see how to export your Gdevelop project to android or ios manually using cordova. Gdevelop provides a web service for export to android or ios. But it is a paid service it only provides 2 exports/day. By paying for subscription you support developement of Gdevelop but it you don't want to pay, Gdevelop provides you with an offline option. We will see how we can export Gdevelop project as a Cordova project and build it using a cordova by ourselves locally on our computer. Obviously for FREE!!. Lets get started. Prerequisite  I am assuming you have Android SDK installed on computer.If not then download it and install it first. I am not covering it here as it is a general thing and you can find plenty of tutorials and also that it will make this post unnecessarily longer. Also cordova requires node.js installed on your computer..Installing is as easy as downloading the installer and running. Link :  https://nodejs.org/en/ After installing the node.js

Gdevelop 5 : How to Find Distance Between Two Objects

In this Post we will learn how to find distance between two objects in Gdevelop 5. Many times we are required to find distance between two objects Gdevelop provides inbuilt functionality for this purpose just let's get started. Creating A Project We will start by  creating an empty  project.  So click on create a new project and name it distance between two objects.  Let's quickly add a scene and a sprite. Let's add another sprite. I will also add text to display the distance between these two sprites.  Let's add these objects to the scene.Now let's head over to the event sheet and Add an event.The condition will be empty and action will to display the distance. So choose the distance choose->modify text and operator be set to equal and click on then expression button. We first have to convert expression to string choose conversion and then number to text. Click on the expression button and then search square root. Click on expression button again and this time

[Inkscape] : How to import inkscape SVGs in Html file

[Inkscape To Web]: Make beautiful sites with SVGs In this tutorial we will make a SVG drawing in Inkscape and will use it in a webpage. The goal of this tutorial is to know how to make beautiful SVG Drawing for your website. Before starting you should have following things, Familiarity with SVGs/Inkscape and HTML  Inkscape Installed. How to Embbed Step 1: Open Inkscape. Now make a simple Shape. I am making a polygon,                                       [Click on the Image to Enlarge] Step 2: Now save it as a svg. The inkscape saves its files as svgs but it is not compatiable with html. It a lot Inkscape specific(useless) data. To save it as plain Svg. Click on File->Save as. Then from dropdown box in the dialog box. Choose the .PlainSvg.  [Click on the Image to Enlarge] Step 3: Now open your favorite code editor i am using the brackets. Now open this .svg File that we just saved using Inkscape.   [Click on the Image to Enlarge]

Gdevelop Game Debugger and Profiler Tutorial

Gdevelop Game Debugger and Profiler In this post we will learn how to use Debugger. It helps us remove bugs from our game. A bug is basically a error or fault in our game that makes game work in in intended. A debugger helps remove bugs from our game. Debugger    Its a tool that is used to inspect the variables and objects of game at runtime. It gives us information about the objects and variables in the game. By using this information we can track the bugs in our game. It Debugger as it helps us remove the bugs from our game.  Using Debugger we can inspect  global variables, scene variables and variables of instances of  objects in the game. We can then analyse this information to find problems in our logic and game. How to Launch game with the debugger To use the debugger, we need to launch the game preview using the Debugger. To do this just go to the toolbar of a scene editor, click on the “Debug” icon and then choose “Preview with debugger and performance

How to make Make money with Inkscape

How to make Make money with Inkscape Inkscape is a free and open source but professional vector graphics editing program for Windows, Linux and Macintosh. A Free alternative to Adobe Illustrator and is used by a lot of enthusiasts, art students and artist all around the world. Ah.. you knew this already? Right!! Otherwise why would you read this post. So here are the ways to make money with inkscape. Selling Vectors This is an obvious one but not as easy as it seems, you see there is a lot of competition, you will  hundreds of sites if not thousands for selling vectors with tens of thousands of sellers on them also it's not that you can sell anything made with inkscape you need to follow some standards.For example here is an article which might be helpful, http://sellingvector.blogspot.com/p/how-to-start-selling-vectors.html?m=1 Tutorials If you want to know more about how to sell vectors created in inkscape then you should read

Blender 3D Graph Builder Addon Tutorial

Graph Builder Addon lets you generate 3D Bar Graphs from simple values. The bars can have simple animation.In this tutorial,I will be making a simple 3D graph in blender with this Addon. You can download the addon on Github and download the data that I am going to use  and end result from here , in case you want to follow along . Though you can use any data you want, just make sure data values are integer and each value is separated by a comma.  Just to give you an idea Graph Builder addon work like this.   Installation Just extract the file. Open Blender and go to user preferences and select “install from the file”. Then locate and choose the graph.py file. Tutorial: There are 4 panels in the addon. We will go to them one by one and see what are their usage. Step1:  Copy Data into the data values and set the factor. Here, you want to enter the values that will be used to draw the graph. Each value represents a bar on the graph. Values must be s

A Quick Look at Machine learning

A Quick Look at Machine learning Ever heard of ‘Artificial intelligence’, of course you did after all we all watch sci-fi movies. But if you ever tried to know more about AI then you might have heard about Machine learning. Also in past few years it's been a hot topic in computer science. So, what is machine learning??. Let's talk about this…, Computer are everywhere today, even in your pocket (your phone).They help us do a lot of thing but in reality these are just calculators with logic and control circuitry.Therefore we can program them to do different tasks.But there are scenarios where we cannot predict the situation and its nearly impossible to program the computer for that.For instance , CCTV Cameras are installed at many places and surveillance has become very easy as it can be done remotely but we need a human to process the video from the cameras as a computer cannot tell us if everything is ok or not.Now imagine if the computer can automatically dete